

Pickled eggs are one of those timeless kitchen staples that feel both old-fashioned and modern at the same time. If you grew up in a family where grandma always had a jar in the fridge, then you know exactly what I’m talking about. There’s something about opening a jar of tangy, flavorful eggs, pulling one out, and taking that first bite—it’s sharp, savory, slightly sweet, and depending on your brine, maybe a little spicy too.
Today, I’m going to share with you a recipe for homemade pickled eggs that gives you the best of both worlds: a traditional brine for those who love that classic balance of sweet and tangy, and a spicy version that kicks things up a notch with red pepper flakes and extra heat.
Whether you want to snack on them straight out of the jar, slice them into salads, or set them out as a unique appetizer for guests, pickled eggs are surprisingly easy to make at home. With just a few pantry staples and some patience, you can stock your fridge with jars of protein-packed, flavor-loaded goodness.
Why Make Pickled Eggs at Home?
There are plenty of reasons why making your own pickled eggs is worth it:
- Cost-effective: A dozen eggs, some vinegar, and a handful of spices is far cheaper than buying specialty snacks.
- Customizable: Adjust sweetness, tang, or spice to fit your taste.
- Healthy: Eggs are naturally rich in protein and nutrients, and with this recipe you can control sugar content by swapping in monk fruit or another alternative.
- Shelf-friendly: Stored properly in the fridge, pickled eggs last weeks, even months.
- Nostalgic: They bring back a sense of tradition and comfort, especially if you grew up with jars of pickles and eggs in the fridge.
Ingredients You’ll Need
This recipe makes about 2 quarts of brine, which is enough for around a dozen eggs, plus the veggies. If you have extra brine, you can store it in the fridge for about a week and use it for your next batch.
- 2 cups vinegar – White vinegar works best for a sharp, clean flavor, but apple cider vinegar adds a slightly fruity tang.
- 1 cup water – Dilutes the vinegar so it’s not overpowering.
- 1 cup sugar (or monk fruit) – Sweetens the brine and balances acidity. Adjust to your taste.
- 1 dozen hard-boiled eggs – The star of the show.
- ¼ cup salt – Enhances all the flavors.
- 2 onions, julienned or sliced – Adds natural sweetness and depth.
- 2 green bell peppers, julienned or sliced – Brings crunch and freshness.
- 1 carrot, julienned or sliced – Adds color and a touch of natural sweetness.
- 2 tablespoons pickling spice – The classic mix of mustard seeds, coriander, bay leaves, and more.
- 2 teaspoons red pepper flakes – For heat. Omit for a traditional version, or add more for extra spicy.
Step-by-Step Instructions
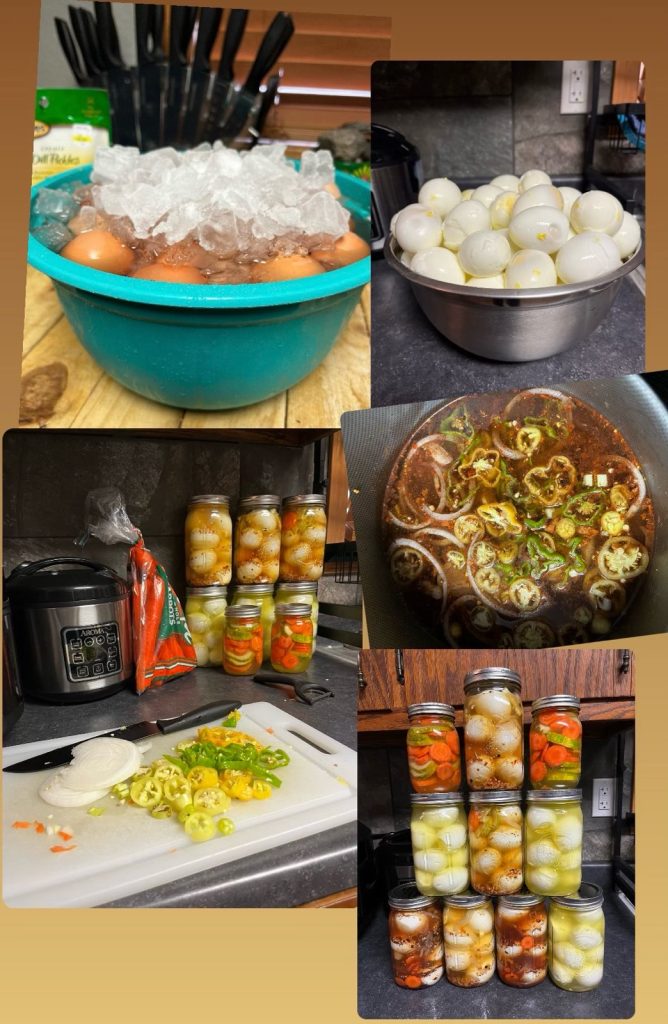
Step 1: Prepare the Eggs
Boil a dozen eggs until hard-cooked (about 10 minutes once the water boils). Drain, cool in an ice bath, and peel them carefully. Set aside while you make the brine.
Step 2: Make the Brine
In a medium saucepan, combine vinegar, water, sugar, salt, onions, bell peppers, carrot, pickling spice, and red pepper flakes. Bring to a boil, then reduce to a simmer for about 10 minutes. This helps soften the vegetables slightly and allows the flavors to meld.
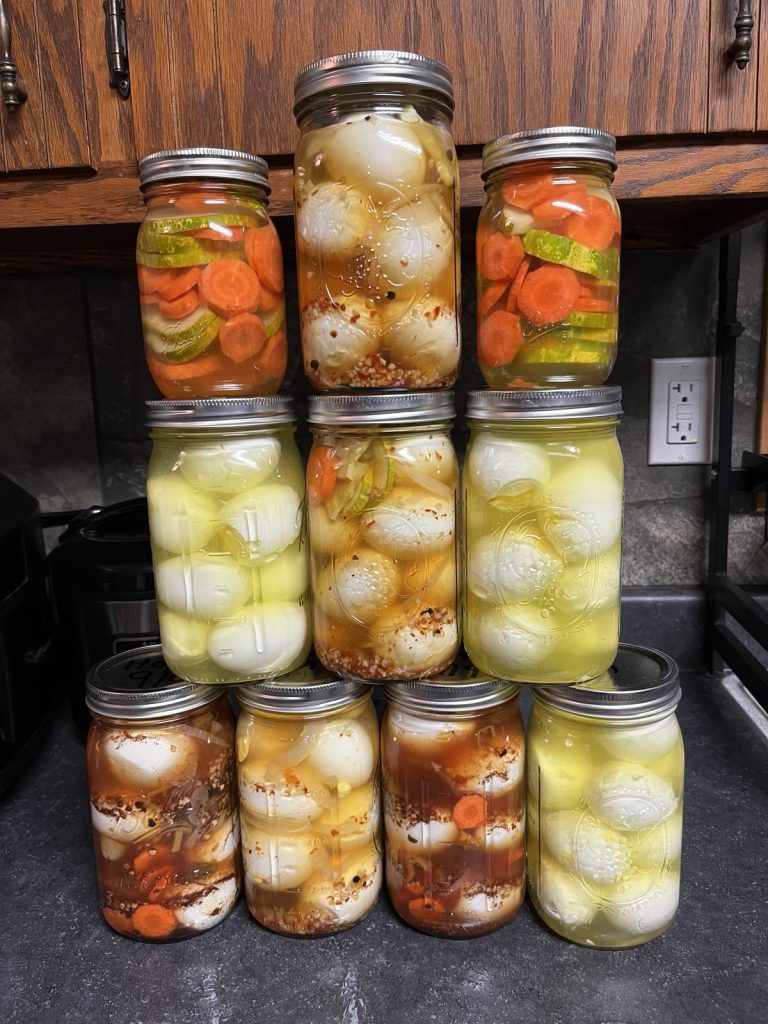
Step 3: Pack the Jars
Place peeled hard-boiled eggs in sterilized glass jars, layering them with the cooked onions, peppers, and carrots. The vegetables not only look beautiful against the white eggs, but they also absorb flavor and make a tasty snack on their own.
Step 4: Add the Brine
Carefully pour the hot brine over the eggs and vegetables, making sure they’re fully submerged. Cap the jars tightly. For best results, flip the jars upside down for a few minutes to help seal, then let them cool to room temperature.
Step 5: Refrigerate & Wait
Here’s the hardest part: waiting. Store the jars in the fridge for at least 3 weeks before opening. This gives the eggs time to fully absorb the brine, resulting in maximum flavor.
The longer they sit, the more flavorful they become. They’re safe to eat sooner, but patience really pays off here.
Traditional vs. Spicy
This recipe lets you decide just how bold you want your eggs:
- Traditional: Stick with the vinegar, sugar, pickling spice, and veggies. Omit the red pepper flakes for a classic sweet-tangy flavor.
- Spicy: Add 2 teaspoons of red pepper flakes to the brine (or more if you love heat). You can also toss in sliced jalapeños or a few dried chili peppers for extra kick.
I usually make a jar of each—traditional for everyday snacking, spicy for when I want something with more bite.
How to Serve Pickled Eggs
One of the best things about pickled eggs is their versatility. Here are a few ways to enjoy them:
- Straight from the jar – A high-protein snack that’s quick and satisfying.
- On salads – Slice them over a green salad, potato salad, or grain bowl for extra flavor.
- With charcuterie – Add to a cheese and meat board for a tangy counterpoint.
- As bar food – Pair with a cold beer for that old-school tavern feel.
- Egg salad remix – Chop them up for a tangy twist on egg salad sandwiches.
- Tacos or wraps – Slice and tuck into wraps with pickled veggies for something unique.
Tips for Success
- Use sterilized jars. This keeps your pickled eggs fresher for longer.
- Sub sugar wisely. Monk fruit or stevia can reduce sugar content without sacrificing sweetness.
- Boil eggs carefully. Overcooked eggs can get a green ring around the yolk; aim for just-cooked yolks.
- Always refrigerate. Pickled eggs should never be stored at room temperature.
- Label jars. Write the date you made them so you’ll know when they’re ready to eat.
Storage & Shelf Life
Pickled eggs should always be stored in the refrigerator. Properly sealed, they’ll last for 3–4 months. However, once you open a jar, it’s best to eat them within 2–3 weeks for optimal texture and taste.
Why You’ll Love Homemade Pickled Eggs
- They’re a healthy snack that’s protein-rich and low-carb.
- The flavor gets better the longer they sit.
- They add something unique to your fridge—more exciting than plain hard-boiled eggs!
- They’re nostalgic and feel special, like a homemade tradition worth keeping alive.
- You can customize the brine endlessly—sweet, tangy, spicy, or even smoky.
Final Thoughts
Making your own pickled eggs at home is simple, rewarding, and honestly kind of fun. With just vinegar, sugar, spices, and eggs, you can create a snack that lasts for weeks and keeps you coming back for more.
Whether you prefer them traditional and tangy or spicy with a kick, this recipe has you covered. Once you get the hang of it, you might even find yourself experimenting with other flavors—smoked paprika, curry powder, jalapeños, or even beet juice for that gorgeous pink hue.
So grab a dozen eggs, a couple jars, and start your own batch today. In just a few weeks, you’ll have the perfect high-protein, tangy snack waiting in your fridge.

Pickled Eggs Version #1 (Classic)
Ingredients
- 2 cups vinegar
- 1 cup water
- 1 cup sugar (or monkfruit)
- 1 dozen eggs
- 1/4 cup salt
- 2 onions julianed / sliced
- 2 green bell peppers julianed /sliced
- 1 carrot julianed / sliced
- 2 tablespoons pickling spice
- 2 tsp red pepper flakes